Microscope Lab #1
|
|
Biology 1 Microscope Lab #1 |
|
Background Information
One of the most important
tools of a biologist is the microscope.
Thanks to Anton van Leeuwenhoek, the development of the microscope has made possible the identification of
thousands of different organisms and parts of organisms that are invisible to
the naked eye. Because of his contributions
to the studies of microscopic organisms, van Leeuwenhoek is known as the "Father
of Modern Microbiology". The microscope you
will be using in class this year is the compound light microscope.
It is called a compound light microscope because it has more than one
lens. The lenses are the parts of
the microscope that are responsible for magnifying the object being viewed.
In this investigation, you
will learn how to correctly handle the microscope and learn the names and
functions of its parts. The compound
microscope we will use in class may not look exactly like the picture of the
microscope on your diagram…but the parts are similar and have the same
functions. If you cannot find a
certain part, or you want to know what something does on the microscope that is
not labeled on the diagram, just ask.
1.
What are the parts of a microscope?
2.
What are the functions of these parts?
3.
What is the correct method for handling a microscope?
1.
Become
familiar with the names of the various parts of the microscope.
Look at the labeled diagram of the microscope that was given to you and
identify each part of the microscope.
2.
Obtain a
microscope from the lab table at the front of the room.
Keep in mind that a microscope is a very delicate instrument and should
be handled with care. Always use
two hands to pick up and carry the microscope.
Hold the arm of the microscope in one hand, and place you other hand
under the base for support. When
using the microscope, be sure that the arm faces toward you.
3.
Compare the
microscope you are using to the diagram page.
Again, the microscope you are using may look a little different, but the
parts are generally the same.
Locate the parts on your microscope that correspond to the labeled parts in the
diagram.
4.
The
following is a list of the parts of the microscope and their functions.
Learn the name and function of each part so that you can safely and
properly use the microscope.
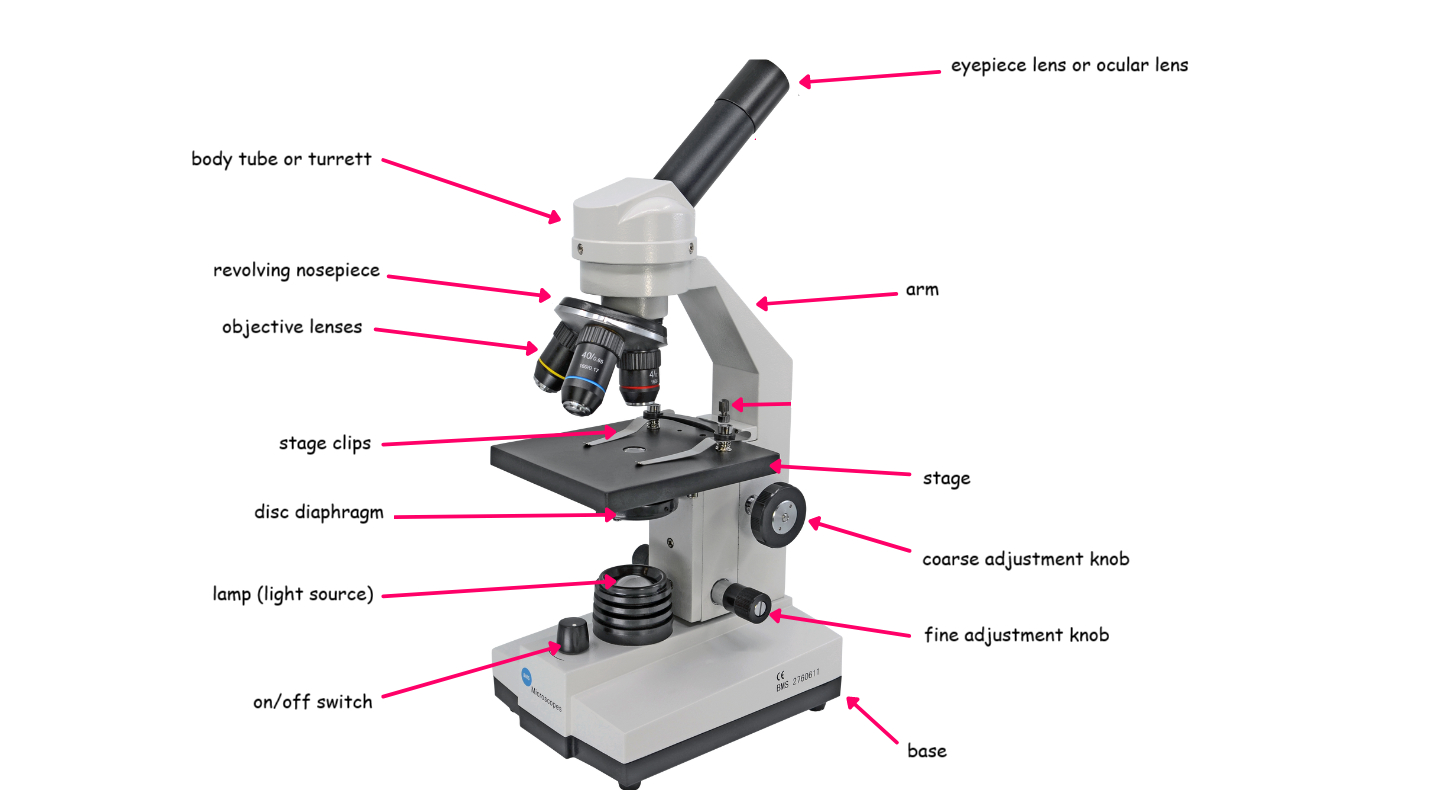
The eyepiece contains the ocular lens, which is
found at the top of the microscope.
The ocular lens magnification is usually 5x, 10x, 15x, or
20x. The ocular
lens power of the microscopes you are using are 10x.
Microscopes that have two eyepieces are called
binocular compound light microscopes.
The body tube maintains the proper distance between the
eyepiece and the objective lenses.
It is the part of the microscope that allows light to
pass upward and through to the eyepiece.
The revolving nosepiece holds the objective lenses.
By turning the revolving nosepiece you can select which
objective to use to view the object you are looking at.
If you rotate the revolving nosepiece you may hear some
slight clicking noises.
When the objective is placed just right, it will click
into place. IF YOU
DO NOT HEAR A CLICK…THE OBJECTIVE IS NOT PROPERLY PLACED AND YOU
WILL NOT BE ABLE TO VIEW THE OBJECT.
The objectives lenses (called the low, medium, or high
power) add to the magnification of the object you are viewing.
The low power objective has a magnification power of 4x
the medium power objective has a magnification power of
10x and the high power objective has a magnification power of
40x. So, if you
multiply the eyepiece power by the objective power you can see
that by using the low power objective we can magnify items by
40x. Using the
medium power objective we can magnify items 100x and by using
the high power objective we can magnify things 400x.
It may not seem so different, but imagine looking at an
ant on the ground from 1 foot away and from 40 feet away! The
same applies to the objects being viewed with your microscope
The stage is the platform upon which the slides rest.
It has a hole in the middle to allow the light from the
lamp to shine through.
On the stage are two metal clips called the stage clips.
They are used to hold the slide in place while viewing.
If you are trying to find something on the slide you may
not want to use these because they can become a hindrance.
Located beneath the stage is the diaphragm.
The diaphragm controls the amount of light entering the
microscope. Some
objects are easier to view with bright light while other objects
are easier to view with a dimmer light.
By using the diaphragm you can control the amount of
light. On the
microscopes you are using the diaphragm is called a disk
diaphragm. It
consists of a disk with several different holes of various
sizes. If you look
at the front of the stage you will see that the disk is labeled
with Roman Numerals (I allows the most light in and IIII allows
the least amount of light in).
The light source is located on the base.
Some microscopes have a lamp (like ours); some may have a
mirror that you can adjust to make use of the overhead lights,
while others may have a fiber optic tube to direct light through
the stage. The
Brock Majiscopes have the fiber optic tubes and work really
neat!
The arm of the microscope is the portion that you lift,
move, or carry the microscope with.
Located on both sides of the microscope are two knobs.
These knobs are used to help you focus the object you are
viewing. The larger
of the two knobs is called the coarse adjustment knob.
This knob, when turned, will move the upper portion of
the microscope closer or farther away from the stage.
This knob is to be used only with the lower power
objective. The
smaller knob is called the fine adjustment knob.
This knob is to be used when making extremely slight
adjustments to bring an object into focus.
It is so sensitive that you may not even see the
microscope move when you turn the fine adjustment knob, but you
can be sure that it does move!
Follow the 3 steps below for viewing objects using the high
power objective:
1) find the
object with the low power objective (making adjustments to get it in focus)
2) rotate the
revolving nosepiece so the high power objective is in place
3) make final
focusing adjustments with the fine adjustment knob only
The base is the part of the microscope that rests on the
table. Make sure
that you have enough room for the microscope to fit comfortably
without falling on the floor.
Many accidents can be prevented by just making sure that
the microscope is not close to the edge of the table.
5.
One of the
most important things to know about using the microscope is to know how to store
it correctly. Below are the 5 steps
you need to follow in order to properly put away and store the microscope:
Step #1)
Remove any slides or materials from the stage.
If the stage is dirty, use some rubbing alcohol and clean it off.
Never use water to clean the
microscope! Water will cause the
metal parts to rust.
Step #2) Rotate the nosepiece so that the low power
objective is in place and then use the coarse adjustment knob to raise the upper
part of the microscope so that is as far away from the stage as possible.
This will prevent any damage to the objectives if the body tube is bumped
during storage.
Step #3) Put away the cord by wrapping it up and tying
it together with the plastic clamps.
Step #4) Cover the microscope with a dust cover.
The first thing you do when using the microscope is to obtain a
clean glass slide.
The slide may be a prepared slide which already has something on
it, or you may get a blank slide, which you will be required to
put something on it.
In either case, make sure that you only touch the edges
of the slide with your fingers.
If you touch the top or bottom of the slide, the oil from
your fingers will make a smudge mark on the slide and it will be
more difficult to view.
If you happen to accidentally touch the top or bottom of
the slide, just wipe it off with some lens paper.
Obtain the prepared slides from the case on the front table.
Holding the prepared slide by its edges, place it on the
stage of the microscope so that the middle of the slide is over
the opening in the stage.
Turn the revolving nosepiece until the low power objective
clicks into place.
Looking through the eyepiece, adjust the diaphragm to permit the
right amount of light to enter the microscope.
This is a personal preference, so you make the final
decision as to what looks alright.
Looking from the side of the microscope, turn the coarse
adjustment knob so that the body tube is at its lowest position
over the opening of the stage.
Looking through the eyepiece, slowly raise the body tube with
the coarse adjustment knob until the object on the slide comes
into focus.
Observe the object in the slide and make a sketch of what you
see in the observation portion of this lab.
Make sure you indicate what the total magnification power
is on the blank beneath the area in which you place your sketch.
Use colored pencils to make your sketch realistic.
Looking from the side of the microscope again, slowly move the
revolving nosepiece until the high power objective lens clicks
into place. Be
careful not to touch the slide with the high power objective
lens. Hint:
the objective will be extremely close to the object.
Turn the fine adjustment knob slightly in order to bring the
object into focus.
If you cannot locate the image, go back and refocus on the low
power objective and follow the directions in step #8 again.
Observe the object under high power.
How is it different from the low power?
Make a sketch of the object in the observation portion of
this lab. Make sure
you indicate what the total magnification power is on the blank
beneath the area in which you place your sketch.
Parts of a Compound Light Microscope
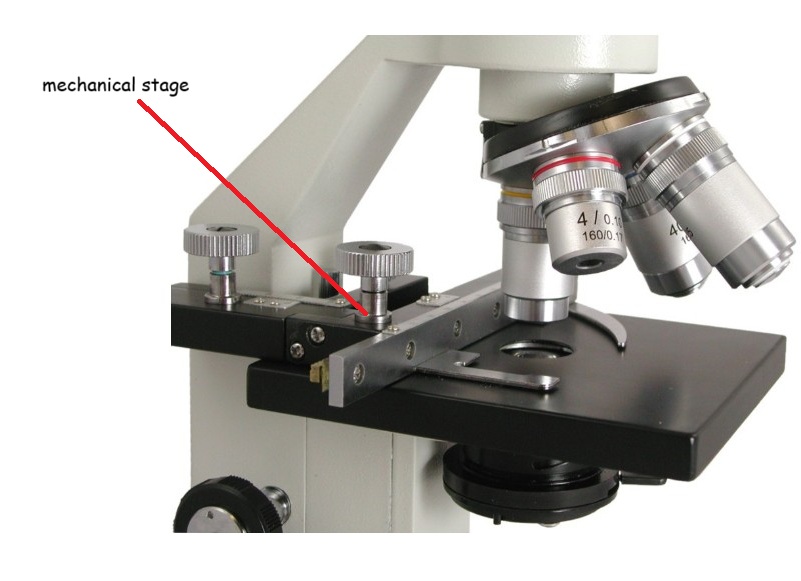
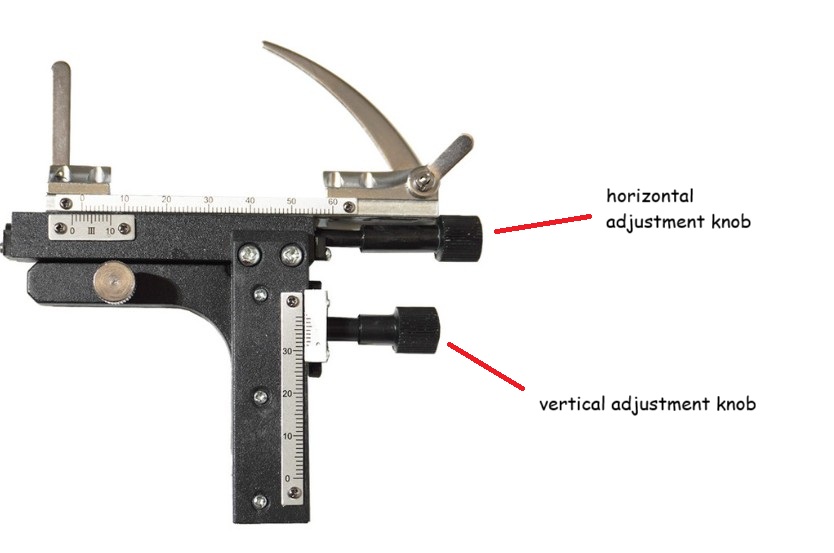
Some of our microscope are equipped with a mechanical stage. A mechanical stage is used to precisely position and move a specimen slide under the objective lens, allowing for detailed observation of different parts of a sample, especially when using high magnification, by providing controlled, fine movements in both the X (horizontal) and Y (vertical) directions. See the diagrams below showing you the mechanical stage.
  |
Part C. Using the Compound Light Microscope
Materials Needed:
compound light microscope
colored pencils
prepared slides of the following specimens:
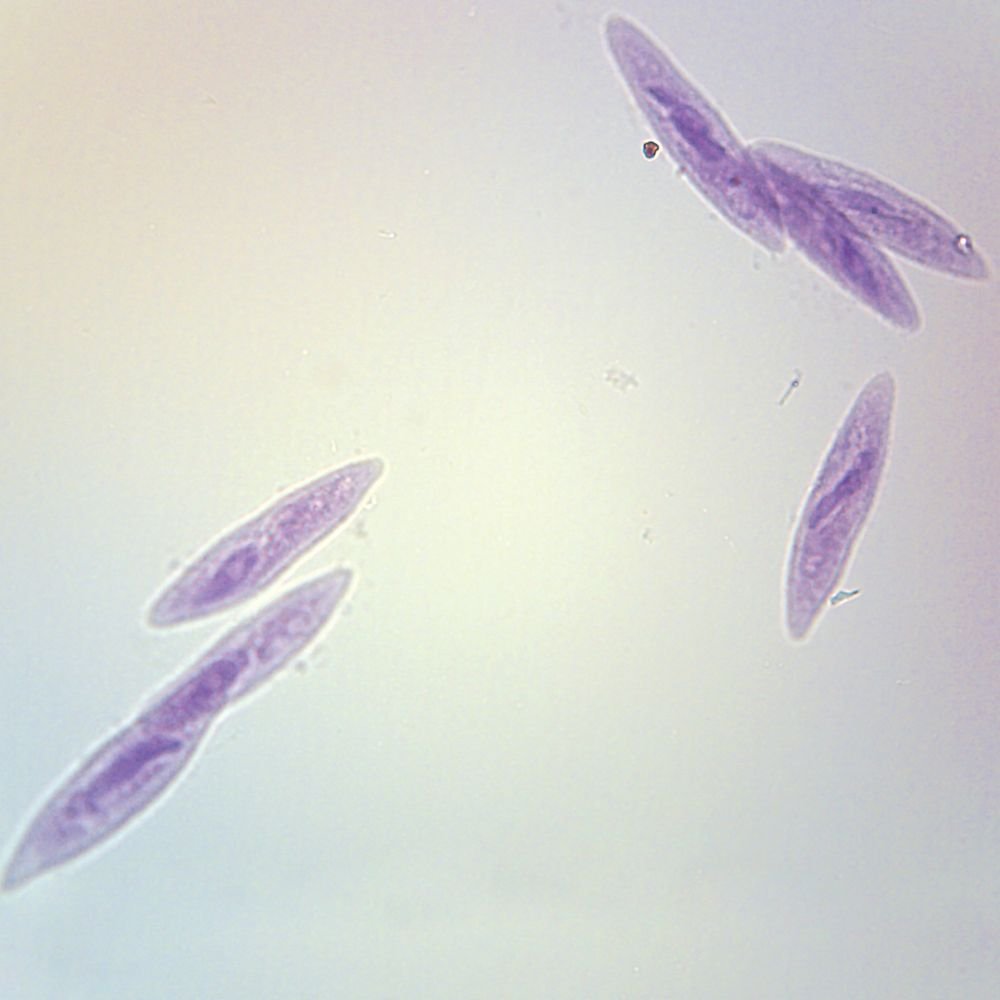
Paramecium caudatum: an animal-like protist that has a cell covered with cilia; moves by beating the cilia back and forth
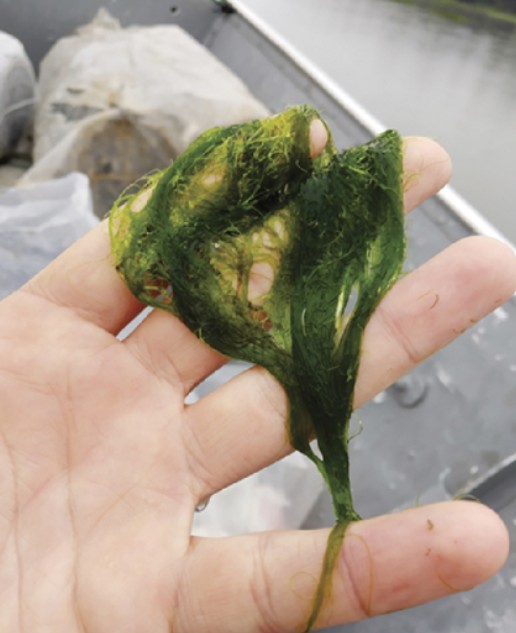
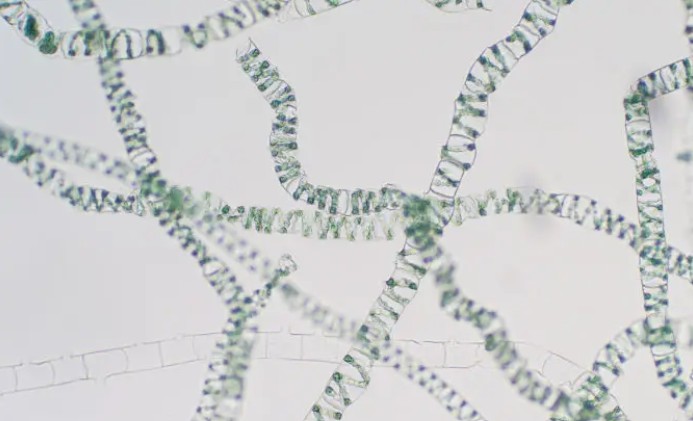
Spirogyra: a plant-like protist that stores its chlorophyll in spiral-shaped organelles; can form large colonies of filaments and when enough are present they look like stringy moss as seen below. The green color is due to the chlorophyll that fills the chloroplasts of these microorganisms.
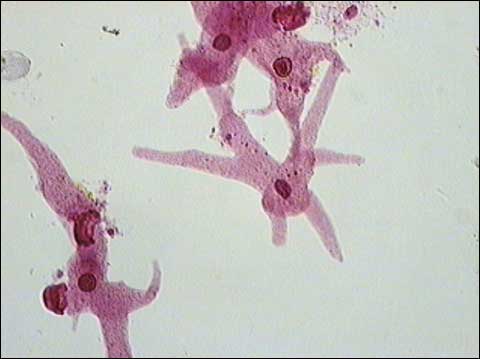
Amoeba proteus: an animal-like protist that has a cell that has no definite shape and can move by a process called "cytoplasmic streaming"; (see the video below showing cytoplasmic streaming)
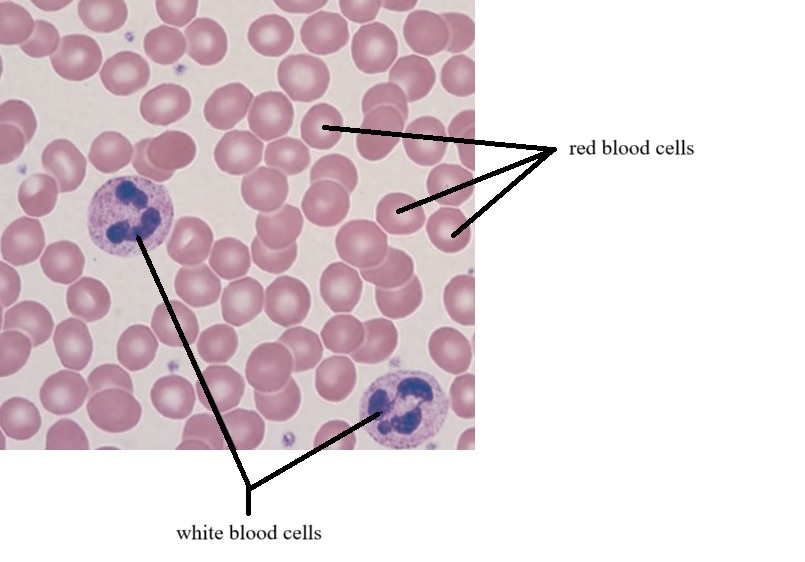
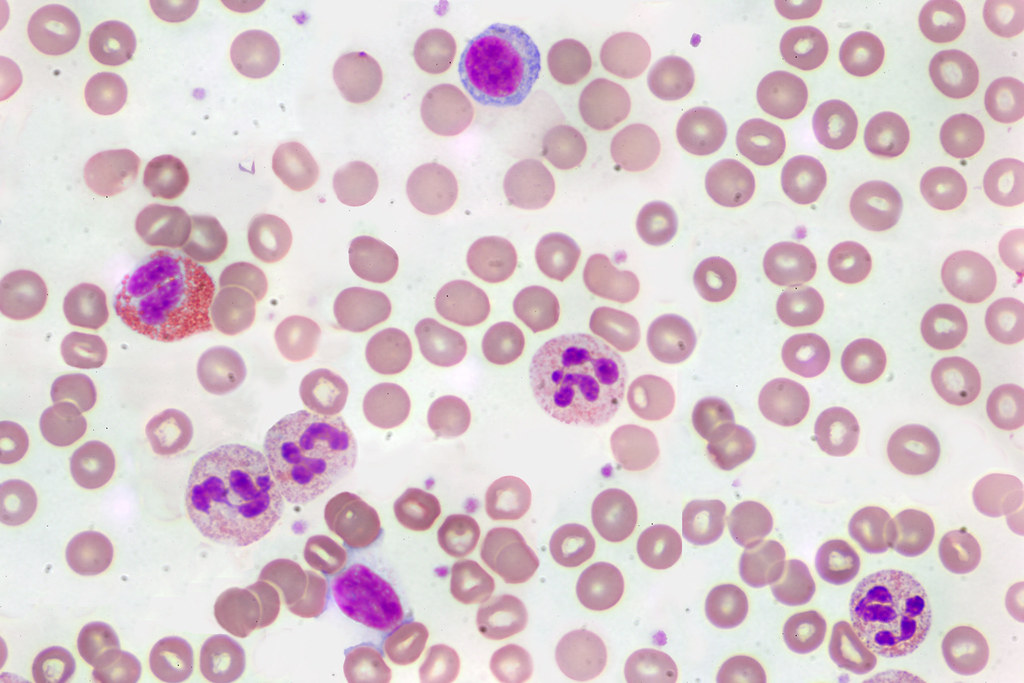
Human blood cells: prepared by staining the blood so that the cells are visible; if you look carefully you might see some white blood cells mixed in with the numerous red blood cells (red blood cells do not have a nucleus unlike the white blood cells where you can see a definite nucleus).
Procedure:
view each of the prepared specimens under low power (40x), medium power (100x), and high power (400x)
on your sketch paper, draw each specimen as you see it under the microscope; use colored pencils to color your diagrams
when you make your sketches, use a regular pencil to draw the outline of the specimen and then use colored pencils to fill in the colors; this will make for a better looking sketch and will also help you define the cell membranes for each sketch
make sure to follow these rules for using the high power objective:
1)
find the object with the low power objective (making
adjustments to get it in focus)
2)
rotate the revolving nosepiece so the high power
objective is in place
3)
make final focusing adjustments with the fine adjustment
knob only
What should the specimens look like that we are viewing in class?
| Amoeba proteus | Spirogyra |
 |
 |
Human Blood Cells |
Paramecium caudatum |
 |
 |